The simplest Gabriel Knight 3 mod you could probably do is to replace a texture with a new one. So that's what this tutorial will cover. Here's the basic process we need to go through to get the mod to work:
- Tell GK3 where to find our new texture
- Put the new texture at that location and give it the correct name
- Enjoy!
The Search Path
GK3 references files by name. To find any given file it needs it looks in several different places, checking each place to see if the file exists. Here's where GK3 looks for files:
- Inside any custom paths
- Inside the .brn files
What makes things nice for us modders is that GK3 always looks for files in those places in that order. This ordering is the key to this mod. What we want to do is to override the the textures that GK3 normally uses, and since those textures are all tucked away inside the .brn files (the last place GK3 looks) all we have to do is give the new texture the same name as the texture we want to replace, and then put our texture in a place that GK3 will check before looking in the .brn files.
There are two different ways to add a custom search path to GK3: editing the registry and creating/modifying the GK3.ini file. Editing the GK3.ini file is the safer of the two, so that's what this tutorial will cover. If you really want to know more about the registry method then check out the "REGISTRY SPEC.TXT" file inside the BRN files.
The GK3.ini file is just a plain text file located in the installation folder of GK3. If you don't already have it then create a new blank text file in your favorite text editor and name it "GK3.ini" and save it. Now whenever GK3 starts it will find that file and attempt to read various settings from it. One of those settings, the one we are interested in, is the CUSTOM PATHS setting.
Add the following to your GK3.ini file:
CUSTOM PATHS = .
Yes, that's a period after the equal sign. That tells GK3 to add the current directory, which should be the installation directory, to the search paths. If you'd rather use another directory then you'd just add the path to that directory after the equal sign instead of the period, making it look something like this:
CUSTOM PATHS = FolderWithAllMyStuff
Note: If you want to add more than one folder to the search paths you can separate them with a semicolon.
Out With the Old
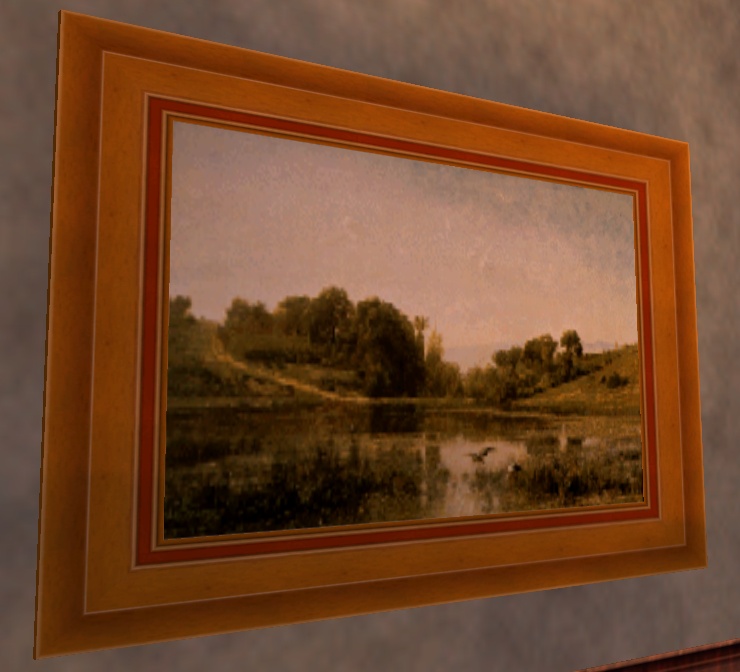
 Let's find a texture to replace. Why not that painting in
the lobby? Maybe Jean wants something new to look at.
Let's find a texture to replace. Why not that painting in
the lobby? Maybe Jean wants something new to look at.
Fortunately for us the painting and the frame are two different objects, so we can swap out the painting texture without worrying about adjusting the frame. The name of the painting texture is LNDSCAP1.BMP. Remember that. It is important.
If you happen to have a copy of the Barn Browser handy it might be helpful to extract LNDSCAP1.BMP and take a look at it. You'll see that it's a meager 256 pixels wide and 128 pixels high. This seems small today, but in 1999 when GK3 came out and top of the line graphics cards were just beginning to approach 64 MB of VRAM this was a pretty good size.
Why 256x128? Why not 260x150 or any other arbitrary size? It's important for texture sizes to be powers-of-two. 64, 128, 256, 512, 1024- those are all powers-of-two. The reason is because video cards are much more efficient working with textures when the width and height is a power-of-two.
Also note that the aspect ratio of the image is 2:1, which is a bit wider than the texture actually appears in the game. That's just because the image we want to see in the game is a little wider than it is tall, and since the width and height of the texture must be a power-of-two it just makes more sense to make the texture something like 256x128 instead of a square 128x128. Not to worry, when the texture is applied to the painting hanging on the wall the video card will automatically resize the painting exactly the way it should be.
In With the New
 Enough of the old texture. Let's find a new one.
We could use a higher-res copy of the same painting,
but I couldn't find a copy of it, so instead we're going
to use Les Champs Elyees by Jean-Antoine Watteau.
I found a copy here.
Enough of the old texture. Let's find a new one.
We could use a higher-res copy of the same painting,
but I couldn't find a copy of it, so instead we're going
to use Les Champs Elyees by Jean-Antoine Watteau.
I found a copy here.
Update: Finding hi-res versions of the paintings is easy now. Check out the Gabriel Knight 3 Gallery!
As it is the image isn't quite usable as a texture. We need to scale it to a more hardware-friendly size, but at the same time we don't want to scale it down too much so that we loose all the nice high-res detail. An aspect ratio of 2:1 would keep the texture basically the same shape as the original painting, and a resolution of 1024x512 would be significantly higher resolution than the original and meet the power-of-two requirement. 1024x1024 or 512x512 would also work.
Now that you have used your favorite image manipulation program (preferably not MS Paint) to scale the image to a good size it is time to put the texture into the game. Remember how the original texture was called LNDSCAP1.BMP? Give the new texture the same filename.
Now, where do we put this image? If you remember from earlier in the tutorial the very first place GK3 looks for files is in the "custom paths." Hopefully by this point you've given GK3 at least one custom path. Copy the new texture (which should be named LNDSCAP1.BMP) into one of those directories you (hopefully) have added to the search path. Then when GK3 looks for that file it will check the search path you specified, find your custom texture, and load it.
Behold
 Now it's time to see what kind of modders we are. Run
the game and go into the hotel lobby. If you see the
new painting instead of the old one then we have succeeded.
Get as close as you can to the new painting and admire how
high-res it is. You can also see how the aspect ratio
we used to save
the image doesn't have anything to do with the aspect
ratio of the painting in the game.
Now it's time to see what kind of modders we are. Run
the game and go into the hotel lobby. If you see the
new painting instead of the old one then we have succeeded.
Get as close as you can to the new painting and admire how
high-res it is. You can also see how the aspect ratio
we used to save
the image doesn't have anything to do with the aspect
ratio of the painting in the game.
Something isn't right...
Before we celebrate too much it's only fair to point something out. Look at the original painting and look at the painting in the game. It's flipped! There is an interesting quirk in GK3 where bitmaps (and therefore textures) loaded straight from the disk are flipped. I'm not sure why that is, but that is.
Don't worry, it's easy to fix. In your favorite image manipulation program just do a "horizontal flip" and save. Now GK3 will display the texture, and the painting, perfectly.
Conclusion
Now we know how to replace textures. And the process is exactly the same for replacing any other file, whether it is a texture or a script or a 3D model. Just make sure your new asset has the same name as the original, put it where GK3 will find it, and presto, you're modding.
Before

After


Notes
- The screenshots were actually taken using the Scene Viewer since I could get much closer to the painting and GK3 seems to compress screenshots a bit too much. This would explain why there are no flowers in the vase. But otherwise the results are identical to what you'd see in the game.
- Why not just tell you about the flipped image quirk at the beginning? Because then it would have been a seemingly arbitrary step and you would soon have forgotten about it later.
- Yeah, yeah, this new painting doesn't quite match Gabe and Grace's comments, but you get the idea.
- How do you find out the name of a texture, anyway? Unfortunately there isn't really a good way to do this yet other than just looking through the contents of the .brn files with the Browser and seeing what you can find.
- The texture used in this mod was scaled pretty big. Big textures take longer to load and take up more memory. Sure, it's nice to be able to put the camera up against the painting and still see plenty of detail, but keep in mind that it's just a painting. It isn't really important to the game, and the player probably won't spend much time paying it any attention, especially from a distance where the extra resolution would make much difference. There's always a tradeoff when using bigger textures, and it's up to you to decide when a more detailed texture is worth it.
- If you're thinking an easy way to get high-res textures is to just extract a texture from the game, scale it up some in Photoshop, and put it back into the game, it won't work. Just because you made the texture bigger doesn't mean you actually added any useful information to the texture. No matter how big you scale the original texture it will still look nearly identical to the original texture inside the game.